Sunday, December 13, 2009

Coconut burfi

I continue from my last post on my love and craving for 'desi' sweets and desserts around this time of the year. The celebratory atmosphere is just infectious, isn't it? A time to let go and forget about the calories for a change - after all the time to make new resolutions is not far!

Coconut burfi is what's on the menu today. Another one of my childhood favourites. Although we rarely made it at home, it was regularly seen around the house when we would have guests over. And I would wait for the guests to leave so I could eat them all up! Haha! Fun times!
Anyways, for those not familiar with a burfi - it is a fudge like Indian sweet and is prepared with a lot of different ingredients and flavours - the popular ones being cashew, almond, coconut, or just with thickened milk.

So here is the recipe.
4 cups finely grated coconut
1 14 oz can of sweetened condensed milk
4-5 cardamom pods - seeded and crushed
Pistachios for garnish

Traditionally, a fresh coconut is used, and of course it gives the best results. But since it is not so readily available here, the dry one from the grocery store works fine and is quick and convenient.
Dry roast the coconut on medium-low heat for a couple of minutes until it releases the typical coconut-y aroma (around 8-10 minutes). Sprinkle the crushed cardamom seeds and stir. Add in the condensed milk and stir. Continue stirring until it all starts to clump up - this should take only about 3 - 4 minutes. At this time, pour it onto a greased plate. Flatten it out evenly and let it rest for about 10 minutes. Allow it to set in the refrigerator for about 45 minutes to an hour. Take it out, cut it into squares and garnish with pistachios. Share

Sunday, December 6, 2009

Malpua - Sweet Indian pancakes in syrup

Amidst all the Christmas festivities and the numerous cakes and desserts to be seen at this time of the year, there are days when I crave something totally ..well, "Desi"! By 'desi', I mean Indian. There are so many amazing desserts and sweets that we make during our festival season, that I am finding myself craving for so many of those these days!
Malpua - a sweet pancake dipped in syrup, and served with milk pudding(kheer), is one of my favourite dishes that my mom makes on some special occasions. The way we make it at home is way too cumbersome for me, and yes, I have tried it a few times, and failed on every occasion :-)
So I took the shorter route, and I can proudly say that it has been successful in each attempt. This one uses condensed milk. Here is the recipe

For the pancake
1/2 can sweetened condensed milk (200 g/7 oz)
1/2 cup all purpose flour
1 cup semolina. (You can substitute it with all purpose flour if you can't find semolina)
1 teaspoon fennel seeds
1/2 teaspoon baking powder
1 cup water
a pinch of salt
oil for deep frying
pistachios/nuts for garnish

For the syrup
1 cup sugar
1 1/2 cup water.

Prepare the syrup by bringing sugar and water to a boil. Keep it aside. I don't make my syrup too thick. Most people recommend a single thread consistency for this syrup. But I like it to be thin, and don't soak my pancakes in it for longer than a minute either. The condensed milk adds sufficient sweetness for my taste.
For the pancake - mix in all the dry ingredients. Then add the condensed milk, and water to form the batter. Deep fry these pancakes in hot oil for a about a minute each side - until they turn golden brown.
Dip these in syrup for about a minute. Serve them on a plate and garnish with pistachios.
These are served with milk pudding, but I didn't make any. So I served it with ice-cream. Vanilla ice-cream would be just perfect with these babies. Share

Thursday, November 26, 2009

Happy Thanksgiving


Don't we all love the holidays? Never mind the stress of getting the perfect gifts, arranging dinners, making the perfect turkey etc, but just the festiveness all around, with shops all decked up, gift sets all around, christmas tree decorations, pies and stollens, candles and tea-lights, wrapping papers and bows, ..ah! I love it all.

A visit to a chocolate shop, a good ol' confectionary, hell, even a grocery store reminds you how it is time to be shopping, celebrating and MOST importantly, - eating!

So when I saw this colourful Lindt Chocolate Boutique at the airport duty free, I urged the hubby to take a picture. So inviting, and full of ..bling!


To all those who celebrate it - A very happy Thanksgiving! (Although I am sure if you do celebrate it, chances are you are busy in your kitchen rather than reading this!).

For the rest, let's just feast our eyes...No, no girls, I am not suggesting to go check out those boys in the cafeteria, rather just watch, enjoy and eat all this food and festivity. Well, you might as well check out those guys while you're at it :D Share

Sunday, November 22, 2009

I am back!


So how are you all doing? It's been very long since I blogged here..not that I have not been seeing the new comments and subscribers - but just that I haven't had the time to update it with new posts. Just saw my drafts - and I had started writing one on 1-Nov, but never got around to posting it. November is when I get to celebrate my birthday, and unlike a lot of others, I am kinda getting the urge to make some resolutions now. The year seems to have flown by so fast! Anyways, more on that later.

So what have I been upto? Well - crazy busy at work to start with, and then a wonderful vacation in Greece! I had been wanting to visit it for so long - finally managed to make it there. We spent a few days in Santorini (one of the islands), and some days in Athens, and also in Prague. Yes, a lot of places - which means a lot of new pictures, new food items, and new recipes.

And much like any other city we have visited - the inevitable happened. While walking down the main streets in Prague, searching for a nice place to grab a bite, we stumbled upon ...
..
Häagen-Daz !


But of course!.
And as you can guess, we had one of those waffles with sinful dark chocolate ice-cream, thick chocolate sauce and some fresh fruits!
For any of you wondering why I go ga-ga over spotting a Häagen-Daz, well, as you would know, some of the ice-creams are to die for, and hence are one of the omni-present items in our freezer. But other than that - it's the waffles! Warm, soft and slightly crispy at the same time, I get hungry just looking at them. These babies are quite hard to find in Zurich, and I don't own a waffle iron. So I almost pounce upon any chance of grabbing them wherever I can spot them - Häagen-Daz being one of my favourites.

I will have a few posts on our Greece trip, and this time I wouldn't be gone too long! :-) Share

Wednesday, October 28, 2009

Almond Tuile..or is it a Taco!


I had discovered the 'tuiles aux amandes' while on a visit to Paris 2 years ago. I shall blog about it in another post, but since that day, I am in love with this yet another French treat! But a wonderful twist to this biscuit came in the form of a dessert at a restaurant here in Zurich. It was a giant tuile - probably better to call it a taco, filled with fresh fruits, served with some chocolate sauce! It was wonderful! And the tuile was very light! The entire dessert made for such a wonderful end to an excellent meal.
I looked up the net, and found just the perfect dessert for the odd day when I have a lot of fresh fruit that I want to deck up and serve. Here is the quick and easy (of course!) recipe

- 1/2 cup almond meal
- 3 tablespoons sugar(of course you could double or triple(quadruple?) the sugar!)
- 1/4 cup + 2 tablespoons water
- Fresh fruit
- Chocolate sauce - either a ready made one - or melt your favourite chocolate!

Preheat the oven to 350 degrees. In a food processor, add in the almond meal (you could use almonds as well, and grind them to a powder), sugar, water and blitz for a few seconds. You should get a paste that is not too runny, but not stiff either - some sort of a goopy consistency means you are good to go. Line the baking sheet with wax/parchment paper. Drop the batter (batter?) onto the sheet, and spread it out into a thin circle - make the biscuit as thin as you can - the oven will do the rest.
Bake it for about 10 minutes. As soon as it is out of the oven, take the wax paper with the biscuit and make it into a U shape. Let it rest like that - you could place the sheet between 2 glasses or something. This is what will give you the taco shape.
Once cooled, place it on a plate with some chocolate sauce, fill in the taco with fruit, throw in a mint leaf for colour. There you have it. A light and refreshing dessert with all the goodness of almonds and chocolate. Share

Monday, October 19, 2009

Swiss autumn


I had the season's first 'Heisse Marroni' today, or 'Hot Chestnuts' in English. Nothing quite dictates the beginning of fall here in Switzerland as a 'Marroni' stand at all the busy spots in the cities selling hot chestnuts in small paper bags. On those cold evenings when both husband and I can manage to catch the same train back home, we buy some to munch along during the journey - oh, feels lovely just to think we are in that time of the year again!

Cool, early evenings, changing greenery with orange, golden and sometimes reds peeping through! That view from the train never fails to take my breath away! And then coming home to a nice hot soup or hot chocolate or even tea! Have I mentioned how I love autumn?
And of course who can miss those giant orange pumpkins - waiting to be carved, cooked or simply used for decoration! I think I'm gonna make one of those pumpkin, oatmeal and chocolate chip cookies - never made those!

Another thing that I am looking forward this season is raclette! The traditional meal with nothing but cheese, potatoes and maybe some wine. Hmmm, that spells bad news for the bum and the tum! Haha! Well, isn't that why the layers and the coats are for? Anyways, here is to a fun, colourful and cozy autumn! *clink* Share

Sunday, October 11, 2009

Cake, fruits and chocolate for dessert


The other day when I wanted to have a quick dessert after my dinner of chicken tikka and naan bread, this is what I came up with. This isn't really a recipe, rather just an idea of assembling a couple of my favourite things for dessert and eating them all together..haha!
This dessert requires you to only have a cake, or a pancake if you prefer, ready, some fruits, and the rest is just assembling them all together. I am assuming there is a stash of chocolate always lying in your fridge!
I made a thin layer of the sheet cake I had made for my jelly roll, and cut out rounds using a cookie cutter. I started by placing 2 pieces of the cake at the bottom of the glass. Then followed it with a layer of berry preserve. You could use any fruit preserve of your choice - this preserve goes really well with any cake that is not overly sweet, and also with chocolate. Place another few pieces of the cake. Layer on some dark chocolate, milk chocolate, and some nuts. Follow with another 2 or 3 pieces of cake. I then added whipped cream with some crushed blueberries. Another layer of cake, and finally some more whipped cream topping. Serve with some fresh strawberries.
It did not turn out to be as clean in presentation as I thought it would, but I'll get better next time around. I think I will try making a jelly inside the glass instead of using fruit preserve so that it does not drip along the sides.

So there you have it. While making it, I actually thought of IHOP and their amazing pancakes - especially their chocolate chip pancakes with whipped topping. I'd probably ask for some strawberries as well! And maybe that double blueberry pancake *mouth waters*. Knock knock - time to wake up! Alas, I am a few thousand miles away from an IHOP! Boo hoo..Miss you IHOP! Share

Sunday, September 27, 2009

Breakfast at Tiffany..er..Migros


Ok, so I have been missing in action for really long now! It wasn't planned to be so. Let me be honest here..September was more holiday, and less work. There were a couple of days I had taken off work, but they were amongst the laziest days I can think of! I did try out a few dishes I've never tried before, and failed. And as they say, If you can't get it right the first time, then order pizza! And so we did :). Not once but 4 times in the last month - that again I think is another record!

Well, to give myself some credit, I haven't been all that lazy. There are a few recipes lined up and you'll see them soon!
For now, I will show the simple breakfast at Migros that we sometimes go for on weekends. And I like it 1) for it's simplicity and 2) for the rustic fresh baked breads that are available. Sure I pick up a gipfeli - the Swiss cousin of the croissant, but it is the other breads that I tend to like more. As is true in most cases - the uglier the bread looks, the healthier it is for you. The harder it is, the lesser the butter in its ingredients - and that means I can happily smear it on while eating!
So here is that breakfast - 2 kinds of bread, some butter and honey, a cup of fruit, and of course coffee.
DH* got a little romantic, and placed a rose on my table..aww..so sweet.

*DH = Darling Husband :) Share

Thursday, September 17, 2009

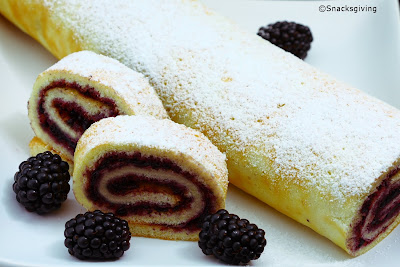
Jelly roll

Do not forget to enter for the $100 giveaway on this blog. Open internationally! Link available here!


After my 2 ambitious and failed experiments, I decided to make something simple. And this is probably that last of my summer berry-licous posts! This time it is blackberries that I used. As usual, it can be replaced with any berry, even a frozen one. In fact, any kind of fruit preserve goes great here as well. A Jelly roll, also known as a 'Swiss Roll' or just a Roulade. Even though it is called a Swiss Roll, it isn't really a cake that originated in Switzerland - just happens to be one of those things where adding the word 'Swiss' would imply quality, precision and elegance. Not sure why we need them for a recipe as simple and quick as this!

Pre-heat your oven to 375 degrees. Prepare the cake tin by lining it with aluminium foil and grease it with oil/butter/cooking spray. Use a larger than usual cake tin for this recipe. I used a cookie sheet because this cake needs to be thin and long.


Here is how I made it. You need
3 eggs
1/3 cup water
3/4 cups flour
powdered sugar
1 cup blackberries.
1/4 teaspoon salt
1/2 cup sugar + 2 tablespoon for making the jelly (As usual, you may want to increase the sugar to 3/4 cup. I don't like it to be overly sweet.)
1 teaspoon vanilla sugar (Or vanilla extract if you have)
1 teaspoon baking powder

Sift the flour, salt and baking powder. Take a large bowl and begin adding the ingredients. First crack the eggs, and beat them so they are light and airy. Add in the sugar and continue beating. Now add the water and vanilla. Now slowly add in the sifted flour, salt and baking powder. Continue beating. Once it is all mixed in, pour it into your prepared cake tin. Bake for about 15 minutes. Once done, take it out of the oven. While still hot, take the cake out of the tin, and roll it up. I used a kitchen towel to hold the cake as I couldn't handle the hot cake. Once rolled, allow it cool for about 10 mins.
Prepare your jelly filling. Wash the blackberries, and add in the remaining 2 tablespoons of sugar. Use a muddler to crush the blackberries until they are reach a slight jelly consistency and are spreadable.
Unroll the cake, spread your jelly evenly, and roll the cake again. Sprinkle some powdered sugar, and enjoy!
Share

Monday, September 14, 2009

My long weekend and failed macarons!


Holidays are just so therapeutic! So relaxing, and rejuvenating no matter how tired your muscles maybe! Of course, that depends on the kind of holiday you like - just lazing around at the beach, or something more active - hiking/trekking/cycling etc. I wouldn't say I am on a holiday, but just took a long weekend, and boy, am I loving it or what! While my husband plays the Xbox with friends to his heart's content, I have been on some wild online shopping sprees, and devouring blog after blog, recipe after recipe, and really gawking at some amazing food photos!
I quite liked it when I saw my Nectarine Pie on the 'Daily Specials' at Foodbuzz today. It's probably not such a big deal, but I liked it still :-)

Well, despite the long weekend I haven't managed to post anything. And that happens to be coz I get too ambitious sometimes, and embark on some really tricky recipes. I had 2 failed experiments yesterday - one with a macaron, and another an Indian dish called - puran poli.

Here is a picture of my failed macarons. I didn't get the coveted 'feet', and neither was the the top smooth and silky :-(. I will try the following the next time around
- Tap the sheet pan to remove air bubbles
- Let it rest for about 40 minutes before popping into the oven
That is really what I can think of. Maybe when I am successful, you shall hear from me on the tips. Of course I shall keep my eyes and ears open if you happen to have some tips for me!
I wanted to make it again today, but didn't. But I am sort of under the spell of French baking at the moment. I think I shall make some almond-tuiles tommorow, or maybe something else. Let's see. Until then, ciao. Have fun y'all! Share

Tuesday, September 8, 2009

My beloved Citrus press


So you know about my love for a good, nutritious and healthy diet. ( I wanted to add 'fit' or 'fitness' also somewhere in the sentence, but alas I can't remember when I last worked out, so have to give it a miss for now..). Ok, so I think I am quite committed to eating and feeding my people nutritious meals. Of course my husband would argue that I use this excuse each time I am at the kitchen section at Manor gazing at the 'ultimate kitchen tool'. Haha...that would actually be quite true. I love to buy kitchen equipment making myself believe that this is just the kind of equipment I need to combat my laziness.

Anyways, so having experimented with a couple of heavy duty mixer-grinders for juices etc, I figured I am no good at it, and the Magic bullet is just what I need. But you see, it ain't good enough to juice an orange or the oh-so-nutritious grapefruit. (Of course, it's no good even at chopping onions, but we'll see to it some other time!)

So when this fabulous little (little?) equipment caught my eye, I decided to get it. A citrus press. It is not a machine - just a manual press that is quite sturdy, and the best part is that it is completely mess-free. Just halve your fruit, place it on the juicer, and press real hard. Voila, you have a fresh and refreshing glass of OJ!. Of course the juice you see in the picture here is not from the same oranges you see in the picture! We had only 2 of those 'orange' oranges left, so we used another variety which was quite yellow in colour (forget which one though). Needless to say, taking the picture took a lot longer than actually making the juice! :)
Anyways, there you have it - our latest acquisition on the road to a healthy diet. Share

Sunday, September 6, 2009

Iced coffee


Coffee! Can your day be complete without the caffeine? (And you thought your decaf coffee was sans any caffeine? Well, think again ). No kind of weather can ever put me away from my beloved beverage - not even a scorching summer afternoon! Just that how I drink it is different - with a lot of ice!

Iced coffee - that is what I had at around mid-day today, instead of my usual espresso or cappuccino ( the latter served with some milk froth and chocolate powder for extra goodness :-)). Everyone has their favourite way of brewing their coffee - the kind of beans used, the kind of coffee grinder, how you store your coffee, how it is brewed..blah blah..there is a whole world out there when we start talking coffee. Let us not get there. I'll just share with you how we make our tall glass of iced coffee.

I prefer making it with what is also called the 'cold brewed' method. Nothing fancy here - just that you stir your ground coffee in water and let it sit a couple of hours (preferably overnight) before you strain, add equal amount of water, and serve it with ice - as opposed to pouring it piping hot onto a glass full of ice (and a plastic or steel one please - you'll most likely break your 'glass' otherwise!).
But this time I used the easier method - I had some left-over coffee from the morning, so I let it cool off and turned it to iced coffee. This isn't the healthiest way because it is more acidic that the cold-brewed method, but it's ok once in a while.

So here is how I made it
Brew your cup of coffee the way you like it. I use a moka pot and use the following for 1 glass of iced coffee
- 2 tablespoons of your favourite ground coffee
- 1 cup of water
- 1 tablespoon sugar
- 1/4 cup milk
- ice cubes
Once the coffee is brewed, I transfer it to a pitcher. Add in the sugar so it dissolves while still warm. Allow it cool for 2-3 hours at room temperature. Then add in the milk and stir - this is optional of course! Pour it in a tall glass filled with ice cubes. And enjoy! Share

Monday, August 31, 2009

Where did it go?


Where did it go? Summer! Why so early? I guess it's never too early for fall! Today is kind of an official start of fall. We have this end of summer festival in Zurich on September 15 of each year..which is the last of those beer-glugging-wurst-eating-cowboy-hat-wearing-half-naked crowd swinging away to some random beats! (That was a long one!).

Well we can't stop the summer, but surely can celebrate the onset of fall! The changing flora, the cozy evenings, cool mornings, bonfires..hot chocolate, pies, hearty soups and stews! And of course Halloween, Thanksgiving (and the Black Friday), Christmas and then New Year..

It is the beginning of change. Sure you'll see it here too..my berries are most likely to be replaced by chocolate! Apple, cinnamon, chocolate, mulled wine are to winter what berries, peaches, watermelons and mangoes are to summer!

Let us all enjoy the last few of those sunny and long days that we have on offer..and bring on the limoncellos, the barbecued fish, maybe some refreshing green salads..
umm..one more mojito for me pleese..hic Share

Sunday, August 30, 2009

Nectarine Pie


After all my posts with berries, I thought of posting something with other summer fruits as well - no I am not done yet with berries - not until they completely disappear from the fresh fruit section of my grocery store! Just using more fruits in my recipes. This time it is nectarines - a nectarine pie. Usually when I think pie, I think pumpkin pie and of course, I think Thanksgiving. (yes, the name is awfully close to this very blog - http://snacksgiving.blogspot.com/)
Pies for me are usually a winter thing. But it's been a while since I made one, and nectarines and peaches are wonderful in pies. So that is what I made.
Of course I never go to the extent of making the pie crust myself - that is just too tedious and time consuming. Buying from the store is what I always do, and recommend as well!
So with the pie crust sorted - it's as easy as 1,2,3! Here is what you need


- 6 nectarines
- 1/2 cup sugar (I don't like my desserts too sweet, so I usually add a little less than that)
- 1 tablespoons fresh lemon juice
- 2 tablespoons all-purpose flour
- 1/4 teaspoon cinnamon
- 1/4 teaspoon nutmeg
- A ready rolled chilled pie crust

Pre-heat your oven to 375 F. Wash and slice your nectarines thinly. In a bowl mix together the cinnamon, nutmeg, sugar, flour and lemon juice. Toss in the nectarines and mix gently for half a minute or so. Roll out your pie crust and place it into your pie pan. Mine was ready rolled in an over proof pan, so it was a breeze.
With a rubber spatuala, scrape the nectarines on to the pie, leave a few to be the top garnish. I placed the top ones as neatly as could, so they look good. Bake the pie 375F for 30-40 minutes. Once cooled, sprinkle some powdered sugar so it looks prettier!
This post goes to the Summer Holidays With Vacation Food event. Share

Monday, August 24, 2009

San Marzano tomatoes


How do you make your tomato sauce for your pasta? Is it out of a jar? Do you use canned tomatoes? Or just about any kind of fresh tomatoes? I guess all of it is fine - these are the options I usually use when making pasta. But today I almost jumped when at Migros - our local grocery store, I saw San Marzano tomatoes, and what's more - they even had those cute cherry San Marzano tomatoes! The bulb in my head just went 'Ting' to tell me 'Tis the season for these precious things! Go grab a basket or two!'

Ok, so what's this deal about a variety of tomatoes after all? San Marzano is the region in Italy where this variety grows and are often touted as the 'world's sauciest tomatoes'. These are very long, meaty and plum tomatoes with very few seeds and a lot of flesh - and they have an excellent flavour. Depending on where you live, you'd find them to be a bit more expensive that the usual variety since they grow only in one region in Italy for a limited period. They are available canned as well, and yes, a bit more pricey than the regular canned variety. Also since there are a lot of imitations - make sure you check for the logo to be sure you are buying the real deal.

Now is the season when they are so easily available fresh. Try it out for making your pasta sauce - And let me know how you like it! I am going to make mine now :) Share

Saturday, August 22, 2009

Raspberry smoothie


I think I have written enough in praise of berries in my earlier posts, that I love them, and how one look at all of them together is a celebration of summer itself! At the risk of repeating myself - 'I love berries' - all kinds! My favourite ones are blueberries but raspberries make for such a lush and rich red drink, or for garnish, along with strawberries, that I love them simply for their colour!

When I had bought my Magic bullet , I thought smoothies and juices would now be the order of the day. I guess I was on a high from reading all those 'Power juice' and 'Fasting with juice' books and how it will detoxify my system, make me 'live a fuller life' etc. I think I was just being too ambitious thinking I'd accomplish that! I still do have the intention of making a healthy concoction with veggies and fruits every morning, but it has remained just that - an intention!

Smoothies with fruits like berries are such a breeze! No peeling, no deseeding, no mess at all. Guess that's why I always have at least one berry in my weekend shopping basket.

Anyways, this is just one of the smoothies me and my husband are addicted to these days. Here's how I made it.


The ingredients are :
- 1 and 1/2 cup fresh raspberries. Of course you can thaw and use frozen raspberries too.
- 1 medium sized ripe banana
- 1/4 cup + about 2 tablespoons milk. I use whole milk.
- Sugar if you need, according to your taste.

The banana I used was nicely ripe and gave the smoothie just enough sweetness, so I didn't use any sugar at all.
So it's as easy as blitzing it all together into a lush red smoothie. Try it, you'd love it! Share

Monday, August 17, 2009

Walkers!


Are you a complete cookie junkie like me? Every weekend when I go grocery shopping, while walking past the cookies and cakes aisle, I always tell myself - no I wouldn't pick up these biscuits - they are tasty yes, but I already have a stash at home!. And we know, nothing beats the satisfaction of baking your own cookies and serving them warm with your afternoon tea or coffee. And I always have my qualms about some of the ready-to- eat store bought items - like the kind of fat used, the amount used , and I'm always looking for the taste plus nutrition factor.

But then there are days that are exceptions - like when I pick up packs of the best biscuits ever made - The Walkers Pure Butter Shortbread. Seriously, these biscuits are divine! And like all things going 'whole'- what with whole wheat pasta, whole wheat 'white' flour, whole wheat tortillas, can butter biscuits be far behind?

So when I saw 'Digestive' butter biscuits, and that too from Walkers, there was no way I was going to pick up just one. These are made with oats, wheat, honey and butter. Trust me you all - try these and I bet you'd thank me for that. Sure it has more butter than I would put in 10 batches of cookies, but you know what - Who cares? These are 'digestive' right? Lol...


So here is how it's made..hehe..just kidding..

Go grab a pack or two. There are some amazing versions. I can't quite recommend one or two..if I start quoting my favourite, it'll probably be all that they have - but definitely try the Shortbread, these Digestive ones, Raspberry and White Chocolate, Belgian Chocolate...oh..I could go on and on. Better visit here for more. And no, Walkers are NOT sponsoring this article (sigh..)

P.S. - It's almost mid-night as I write this, but just looking at the pictures of these beauties has made me pining for them all over again...and there go another couple of them in my hungry tummy!
Share

Wednesday, August 12, 2009

Italian Almond biscotti

Do not forget to enter for the $100 giveaway on this blog. Open internationally! Link available here!


On a good day if you ask me what would I like with my coffee - it would probably be a healthy little cookie like an oatmeal and whole wheat kind, or one with arrowroot, maybe a macaron, or a biscotti. But of course there are days when I sit eating up an entire package of a peanut butter or chocolate chip cookie and not offer it to anyone..lol!
Of all these healthy variety, I have to say - macarons and biscotti are my favourite. Simply because you can play around so much with the flavours and colours and it just tastes great!
These cookies are from Italy and 'biscotti' just means cookie in Italian. These are baked twice giving them a long shelf life. Usually the Italians would dunk it in their dessert wine and eat, but of course, coffee and tea are also its wonderful companions! Here is how I made it.

2 cups all-purpose flour
3 large eggs
1 teaspoon baking powder
1/8 teaspoon salt
3/4 cup granulated white sugar. I know some people add 1 cup, but I think 3/4 gives just the right sweetness for me.
1 cup almonds, toasted in the oven for about 8-10 minutes at 350 F
1 teaspoon vanilla extract ( I use vanilla sugar coz we don't get vanilla extract here easily!)
1/2 teaspoon pure almond extract. This is what gives the biscotti their signature almond-y smell..love it!


Coarsely chop the toasted almonds. Snack on a couple maybe - they taste so good!
Combine the dry ingredients. In a seperate bowl, combine the eggs, vanilla and almond extracts. Add in this mixture to the dry ingredients slowly and stir. You could use your electric mixture for this. Add in the chopped almonds and the remaining egg mixture so that you get it to form a dough. Shape the dough into 2 logs about 10x2". Bake it on a 350 oven for about 40 minutes. Then take it out of the oven, let it cool so you can work with it- about 8-10 minutes, and cut them at a diagonal so that you get that classic biscotti shape. Lay these biscuits flat and bake for about 10 minutes again per side, or if you can make it to stand, then just once would be fine.
Allow it to cool a bit before you pop it into your mouth :)
Share

Tuesday, August 11, 2009

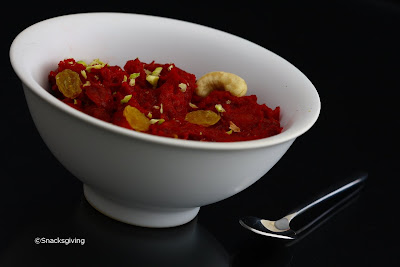
Beetroot halwa

Do not forget to enter for the $100 giveaway on this blog. Open internationally! Link available here!

So who wants a dessert that is healthy too? And has more nutrients than you can count. Don't think too hard - I'll answer it for you - it is my latest favourite dessert - Beetroot halwa. A quick search on the holistic benefits of beetroot will enlighten you on how good it is for you, but I had been eyeing on turning this vegetable into something that I can fall in love with. I don't like it raw, I don't like it in salads, not in a vegetable curry, not in a soup..yeah I am quite choosy that way. But I need my iron. I will not turn this into a health bulletin but all you folks who don't eat red meat - you need your iron - which you'll find aplenty in this veggie.

So last weekend i tried turning it into a dessert - a halwa. Traditionally a halwa uses copious amounts of ghee(clarified butter), but since it is not so easily available in stores(except Indian and health food stores) I replaced it with a can of condensed milk. And it was ready in minutes. Of course after 30 mins of my work out in grating it very fine. So here is how I made it.


- 1 large beetroot washed, peeled and finely grated
- 1/2 can of sweetened condensed milk
- 2 and 1/2 tablespoons ghee/butter
- 4-5 cardamom pods or 1 teaspoon of cardamom powder
- 1 tablespoonful of cashews/pistachios/almonds
- 1 tablespoon raisins

Heat 1 and 1/2 tablespoon ghee or butter in a heavy bottomed pan. Add in the beetroot and fry it on medium heat for about 10 mins. Add in the cardamom. Then add the condensed milk and reduce the heat. Keep stirring for 20-25 mins. In a seperate pan, add in the remaining 1 tablespoon of ghee and then the nuts and raisins. Once the nuts get a light brown colour and the raisins puff up, add them to the halwa.
Add some more nuts for garnish while serving.

I made this last weekend just as a test since I am known for not liking this humble vegetable, but was surprised when my husband ate up 2 cup fulls of deliciousness and demanded I make it more often. And I couldn't be happier to finally start my love affair with this vegetable so understated! Share

Tuesday, August 4, 2009

Blackberry cake

Do not forget to enter for the $100 giveaway on this blog. Open internationally! Link available here!

When I picked up a basket of blackberries this weekend, I was thinking more on the lines of blackberry coulis drizzled over an angel food cake, pancake, or just about anything sweet. But while I was grocery shopping, I saw this new ad showing a cup of coffee and a big slice of cake with all kinds of berries in it! I would have stopped and eaten it up right there - but I was alone, and eating alone isn't much fun as we all know. Also, I managed to prove one thing to myself - the oft-repeated "Do not go grocery shopping when you are hungry". I can tell you - nothing can be more true!
Anyways, so I came home and decided to make a cake, and eat it too! A blackberry cake. This is the version I made - although I usually prefer making a simple cake - like an angel food cake and dress it up with some cream cheese and berries. Here is the recipe


1/2 cup butter
1 cup fresh blackberries - washed and completely dried
2 cups flour
3/4 cup sugar
2 eggs
1 teaspoon baking soda
1 teaspoon cinnamon powder
1 teaspoon nutmeg (freshly grated is lovely, although the powdered one works fine)
1/2 teaspoon vanilla extract
1/2 teaspoon salt
1/4 teaspoon ground cloves
1/4 teaspoon ground ginger powder
3/4 cup buttermilk

Preheat your oven at 350 degrees, grease your cake tin and sift the flour, and all the dry ingredients together in a bowl. Now cream the butter and sugar. Add in the eggs one at a time, and continue beating. Add the flour mix slowly and gently mix it into the butter-egg mixture. Add the buttermilk slowly else it will cause lumps to be formed. Gently fold in the blackberries. Pour into the cake tin and bake for about 55 minutes. Once done, add your choice of icing. I really couldn't wait to eat it up, so just sprinkled some powdered sugar, and chocolate gratings.

Of course, the berries never made it to a coulis :)
Share

Sunday, August 2, 2009

Spicy Rice flour pancake


Think pancakes - think sweet. Maple syrup, fruit, maybe some whipped cream. Savoury pancakes - yeah, we all have heard of them, few have had it, and then some make it as well. Indian food offers some wonderful pancakes, my favourite one being dosa. Although simple, it needs a bit of pre-planning as you need to allow for some fermentation time. This one - called 'Sarva Pindi' is made with rice flour. Hence, is easy peasy! Just bring together a couple of ingredients, and cook it like any other pancake.
Apparently, this dish is losing the following it once had and is dying out. All this information, and the recipe come from a very famous Indian chef on YouTube - Sanjay Thumma - also known as VahChef for the Netaholics. You can check out his recipe here --> VahChef's Sarva Pindi
Usually had as an evening snack, I wanted to make something that's not sweet, and is easy to make in the morning. Ofcourse I am talking a weekend morning, cooking an actual breakfast on a weekday doesn't even strike as an option to me. I am lucky if I can manage to run and catch my train on time :-)
Someday I would probably do a post on the many different varieties of bread I pick up sometimes for a breakfast-to-go. But for now enjoy this rice flour pancake.
This entry goes to the Rice Feast being hosted by Aathidhyam Share

Birchermüesli


Nothing can be as quintessential a swiss breakfast as a bowl of hearty Birchermüesli or simply Muesli. And those not all too familiar with the 'guttural CH' or the "gargled R" sounds of German, here is a bit of pronunciation course. Bir-kher-Mew-slee. And trust me, if you are not German, or Swiss German, you will NOT be able to pronounce it the way people here do. I was once told by a Swiss friend, that I should gargle and practice if I want to perfect it. Needless to say, I gave up right there!
For all you followers of the Quick Quaker Oats(or whatever it's called), this is my humble request to you. Just try this one out for once. It is almost as easy as getting stuff straight out of a box - just that you may need to open too many boxes :). And you need to pre-plan a bit.
This recipe was originally created by the physician Bircher-Benner, but has been now adapted to suit different tastes and lifestyles.


The kind that I made is just one variation. The traditional one uses apples - you could use whatever fruits you like or are in season. Also the choice of nuts is upto you. The important thing is to soak the oats the night before - or at least a couple of hours before serving. So here is how I made it.
- 1 cup rolled oats
- 1/2 cup orange juice
- 1/2 cup yoghurt
- Some chopped and/or flaked almonds
- handful of raisins
- 1 cup blackberries
Soak the oats in juice and yoghurt and refrigerate it overnight.
Before serving, add in a few blackberries per serving in a bowl and crush them. Mix it with the oats-yoghurt mixture until you get the colour you like. Now add in the nuts, raisins, and more blackberries if you like.
There you have a healthy, nutritious and easy breakfast.
Share

Saturday, August 1, 2009

Happy Swiss National Day!


Happy Swiss National Day you all! For those not from this part of the world, 1st of August is what 4th of July is to America, or 15th of August to the Indians. Also known as Schweizer Bundesfeier(German) or Fête nationale(French) or Swiss National Day to us lesser mortals with poor language skills!

I would not bore you with the history or speeches..the latter always making me shout Run!! Run away! But just for a bit of trivia, this was the day in 1291 when Uri, Schwyz and Unterwalden - 3 Alpine cantons swore the oath of confederation, an act which later came to be regarded as the foundation of Switzerland.
It is a national holiday, but alas, this year it happens to fall on a Saturday, so no extra holiday. Tough luck!


As for the celebrations, there are some fireworks in some cantons, but in most villages and towns, people light a fire, and enjoy Bratwurst, Büürli and beer - which is basically sausage, bread and beer :-)

One thing I really like is that around this time of the year, you can find the swiss flag almost anywhere - right from mugs, T-shirts and fondue pots to eggs, bread, even cheese and meat!
I picked up this bread which is specially made for the 1st of August, and has cute little Swiss flags, along with a '+', again from the flag - simply called Swiss national day bread. Nice, isn't it. Have fun again y'all Share

Wednesday, July 29, 2009

Belgian Waffles and chocolate ice-cream


Waffles! Who doesn't love them. Served with warm chocolate sauce and if you like it even more chocolat-y - some belgian dark chocolate ice-cream! Whoa..somebody's mouth is watering, and then somebody's jealous..lol!

Anyways, on my trips to the different countries in Europe I have almost always managed to spot a Häagen-Dazs at some touristy place (much like the forbidden McDonalds always peeping out of every nook and corner of every city). Not that I go looking for it - I much prefer eating at the local trattoria or brasserie than a Häagen-Dazs. But once there, I just cannot ignore those enticing pictures of a bed of waffles with icecreams and nuts all over it! Also, being in Zurich doesn't help. You see in my almost 3 year long quest here, I have not been able to spot any decent place serving belgian waffles. Crepes, yes, pancakes too, but no waffles.
On my 2 day trip to Brussels, I had waffles for breakfast, lunch, snacks and then I think I wanted it for dinner too until my husband intervened!

So imagine my happiness when just walking past Bellevue (the lakeside) at Stadelhofen, I spot a picture saying 'Neu'(german way of writing 'New') at the Movenpick outlet. There they were - belgian waffles with ice-cream. Hubby and I tucked in a plateful each :-) Share

Tabouleh


Lately I am finding myself drawn to Middle Eastern food. It had started with the Naschmarkt in Vienna where I had some delicious turkish sweets, and later at a Lebanese restaurant I happened to visit a couple of weeks ago. Anyways, this is the first recipe that I have for you. Well for a lazy bum like me, I need to make a dish that's just a matter of moments, is not high in fat at all, high in nutrition, and of course tasty.
So I found myself making tabouleh aka tabouli or tabbouleh. Anyone who is not middle eastern will tell you that you need 'cracked wheat' for this recipe. Not the clever geniuses like me ;)
What you need is 'bulghur'. Bulghur is wheat that has been parboiled, dried, and then cracked. So its partially cooked already which makes it very easy to work with. If you are like me(read lazy) you want the finest one - as in coarse/medium/fine finest. The medium or coarse variety is preferred if you are actually cooking it - here we'll just soak the fine bulghur. Cracked wheat is just that - cracked wheat - it isn't pre-cooked like bulghur, hence calls for a longer cooking time or soaking time.
Ok, so that's what you need. If you cant find bulghur, you can use cracked wheat too, but then you need to soak it for at least 30 minutes.
So you need 1/2 cup bulghur, Soak it in about double the quantity of warm water. Set aside for 15 minutes. In the mean time get chopping..and you need to do a lot of chopping. Here's the list ..just chop on like theres no tomorrow..and chop finely..


2 bunches of fresh parsley
1/2 bunch fresh mint (love this! Try not to skip it)
2 tomatoes
1 onion - I like to use green onions as they are not sharp at all
Juice of 2 lemons
freshly ground black pepper and salt to taste
2 tablespoons of good extra virgin olive oil. You can be generous with the oil if you like..but thats how I would prefer.

Sometimes I add some lightly toasted chopped walnuts just for a bit of crunch. Also 1/4 of a cucumber is good.

By now it should be 15 minutes. Check your bulghur. Drain any excess water, and loosen up the wheat so it fluffs up a bit. Combine it all, and dig in. You can have it with pita bread or Lettuce leaves or just as is. Takes all of 15 minutes and is refreshingly delish.
Give it a go..you'll love it Share

Monday, July 13, 2009

Mango lassi


Ever seen that advert on CNN where they use a washing machine to churn out mango lassis but the bucketfuls? Never mind. Well I'm pretty sure that a washing machine is certainly not the must-have equipment for a good ole' mango lassi! Let's just leave it to doing what it does best!
Mango lassi is a sweet creamy yoghurt drink from India. And there is no reason why you should have it only when dining in an Indian/Thai restaurant. Try it at home, it is even more tasty when you make it yourself :)
There are 2 main ingredients in the lassi - mangoes and yoghurt. This drink tastes best if you use a variety of mango called the 'Alphonso'. They are only seen in Indian stores for about 2-3 months, and are a bit on the expensive side. But trust me, once you have had this fruit, you cannot but help get addicted to it. It is soo good! Just try it once, and you'll know what I mean. Now is the season to rush out and grab yourself a box (maybe 2). If you cannot find fresh mangoes, you 'could' use mango pulp from a can - but really, nothing beats the real deal.
Ok, so let's talk about the remaining ingredients


- 1 cup yoghurt.
- 1 cup ripe alphonso mango - peeled and chopped
- 2 tablespoons water(optional - use it only if you want a lighter consistency)
- A teaspoon each of chopped pistachio and almonds
- A pinch of cardamom powder
- 4 teaspoon sugar - adjust it according to the sweetness of the mango. If you are using mango pulp from a can, keep in mind that it is usually already sweetened, so you may not need the sugar at all.

Blend the mango, yoghurt, water. Taste it, and add sugar and/or water if you like. Pour it into your serving glass and garnish with the cardamom and nuts.
Share

Chicken tikka


Chicken tikka, Paneer makhani, Vegetable samosa, gulab jamun..
Some dishes command that they only be used in a sentence with a few superlatives. When reading the menu at a nice Indian restaurant, I usually find myself saying 'wow, awesome, sounds great, this'd be delicious..' - all of it making my mouth water!
Anyways, so today we had chicken tikka for lunch today, and boy, did it taste awesome or what! And as is the case with most dishes that we make frequently (yes 'we' because chicken and fish are usually my hubby darling's specialities), it is quite a simple dish to put together - it does need a lot of ingredients, but if you have them all handy, it is hardly any effort to transform it into a delicious dish. So here is how to prepare it.
- 1 onion
- 2 bell peppers (of different colours)
- 2 tomato
- 500g chicken
Cut all the above into bite size chunks.


For the marinade, you need
- 1 cup yoghurt
- 1/2 teaspoon crushed ginger
- 1/2 teaspoon crushed garlic
- 1 teaspoon garam masala
- 1/2 teaspoon cumin powder
- 1/2 teaspoon coriander powder
- 1/4 teaspoon turmeric
- 1/2 teaspoon fenugreek leaves
- 2 green chillis - finely chopped and de-seeded if you don't like it hot
- juice of half lemon
- 2 tablespoon oil
And some coriander for garnish

Mix all the ingredients for the marinade. You can marinate the chicken and vegetables for 30 minutes or more - marination does add to the flavour, but we usually skip it, and guess what - it still is very tasty!
Thread the chicken and vegetables onto skewers, and place them on a hot grill. Keep some gaps between each chicken/vegetable piece to allow for even cooking. Cook for about 10-12 minutes, turn over the skewers, and cook for another 10 minutes. You could also cook this in an oven - preheat it to 350 degrees, skewer on the chicken(soak the skewers in water for about 30 minutes prior to using), and bake it for about 25 minutes. Use a lemon wedge and some coriander leaves for garnish and dig in! Share

Sunday, July 12, 2009

Chocolate and coffee truffles


Chocolate and coffee. Two of the greatest gifts to mankind. Bring the two together - and what you get is pure indulgence! To reduce the guilt, throw in some rolled oats, maybe some wheatgerm, and you have a wonderful excuse to have your daily dose of indulgen..erm..nutrition ;)
The recipe couldn't be simpler. Only a few ingredients, and hardly any time to cook, this one is ready in minutes. It keeps well for at least a week (I haven't had the chance to test it longer - it doesn't usually last more than a couple of a days!), and looks great too so makes for a very nice and easy gift. Here is the recipe.

- 2 1/2 tablespoon butter. You could use peanut butter or almond butter to up the nutrition factor - just remember to adjust the sugar accordingly
- 1/4 cup sugar
- 3 tablespoons packed brown sugar.
- 1/4 cup freshly brewed coffee
- 1/4 cup unsweetened cocoa powder.
- About a cup of rolled oats
- 1 tablespoon wheatgerm
And toppings of your choice.


Melt the butter. Add in the both the sugars, and let it simmer for a few minutes. Now add the coffee, and cocoa powder. Bring it to a boil, and take it off the heat. Put the oats and wheatgerm in a mixer and powder it. Once the coffee mixture is cool enough to work with - about 15 minutes, throw in the oats mixture and mix it up. Now get your hands dirty and start shaping the balls. (Maybe eat it a bit while you're at it). Roll these into the toppings of your choice. I used more cocoa powder(!), shredded coconut, and powdered sugar.
A word of warning - even though these babies are not all that bad for you, don't kid yourself and eat them all up. Save some for your friends and family ;D
I would be posting this for the 1x umrühren bitte's Event Share

Saturday, July 11, 2009

Baked Samosa


Samosa. The crispy pastry filled with spicy potatoes, served with chutney, savoured everywhere and loved as an appetiser and snack by all. An Indian snack - the original recipe calls for deep frying the stuffed pastry, but if you know me, you know how averse I am to deep frying (and also quite stingy when using butter and oil). But how can I miss out on the good things in life? Samosa being one of them! It is easy to make if you use something like a puff pastry sheet, or wonton or a spring roll wrap. I made the dough myself, but for the sake of ease, let me just suggest you to buy one of those wraps. Also, samosas are so versatile, maybe in another version I'll share how I make the dough for the wrap. So here is how I make the samosas.

- 2 large potatoes - boiled and mashed.
- 1/2 cup peas
- 1 onion - finely chopped
- 1 or 2 green chillis - very finely chopped, and de-seeded if you don't like it hot.
- 1 teaspoon grated ginger
- 2 tablespoons oil


For the spices,
- 1 teaspoon cumin seeds
- 1 teaspoon coriander powder - freshly ground works beautifully
- 1 teaspoon garam masala
- 1/2 teaspoon dry mango powder.
- salt

In the hot oil, add cumin, and chillis and saute for a few seconds. Add in the ginger, and onions, and salt and fry for a few minutes. When the onions are golden brown, add in the peas and the remaining masala and let it cook for 8-10 minutes. Mix it all with the mashed potatoes. Let this mixture cool for a few minutes. This stuff is so tasty that I make a lot more than I need, and make sandwiches with it the next day!
For the wrap, choose a wrap of your choice. Puff pastry works well and is very easy to get too. Cut it into approximately 4" x 8" pieces. Place a small amount of the mixture at the bottom of the 4" side, and fold it to form a triangle. Fold it twice and seal the edges with water-flour mixture(Add a tablepoon of flour to about 3 tablespoons water). You could make any shape you like, and also create the traditional trianglular shape many ways. You could also cut squares from your rolled out dough, and fill the potato mixture diagonally and close it so it resembles a cone. Brush some oil on the samosa and bake it in a 350 C oven for about 20 minutes. I served mine with a coriander - mint chutney and a thai sweet chilli sauce. Share

Blueberry pancake


I am back with another of my summer breakfast staples. And no prizes for guessing - if it's summer can berries be far behind? Blueberry pancake. Made with fresh blueberries. Of course it can be a winter pancake too - you'd just have to substitute with the frozen berries - thawed of course.
Yes, we all know how to make a batch of nice, light and airy pancakes - no one needs a course on that. But what I like about the way this version is made is the way egg whites are used. Usually, you would sift the dry ingredients, beat the egg, milk and butter, and then combine the two. That is perfect! But this one needs the egg whites to have soft peaks - and that too contributes greatly to the airy and fluffy texture along with the baking powder giving a perfect pancake!

So here is how I make it


- Take about 1/2 cup fresh blueberries - washed and dried.
- 1 cup white flour
- 1/4 teaspoon salt
- 1 teaspoon baking powder
- 1 egg (seperated)
- 3/4 cup milk
- 1 tablepoon oil
- 1 tablespoon sugar

Seperate the egg yolk and white, and keep the white in a clean dry bowl.

Add the sugar to the egg yolk, and whisk it a bit. Add the milk and whisk it again. Now sift the flour, baking powder, sugar and salt into the egg yolk mix, and combine slowly. Do not mix it too much since it will make the batter glutinous and you will have a stiff rubbery pancake. Switch on the gas now and put it on medium high. Now quickly beat the egg white till it forms soft peaks, and fold into the flour mixture. Make sure you use a clean whisk to beat the egg whites - else you wouldn't get the peaks.

Add a few drops of oil on your hot pan, and place a dollop of the pancake batter. Place a few blueberries on the pancake. Turn it after about 1 minute or so of cooking, and let the side with the blueberries cook for another 30 seconds or so.
Serve with a knob of butter, and maple syrup or honey. Share

Friday, July 10, 2009

Fish and chips


I should mention at the very start that this is not the traditional 'fish-n-chips' that you find at the friendly neighbourhood take-away of every street in Britain. Those are fried and then usually fried again in a batter of flour, spices and beer for best texture, colour and flavour. I love those, but when I'm cooking at home, deep frying is first of all not the best way I would like to cook, and of course it leaves the kitchen quite messy. So mine are the oven baked 'chips'. And fish was cooked on an electric raclette grill. The recipe is as easy as it gets.

Take some russet potatoes. 4 large ones work well. Cut them into wedges of a thickness you like. In a seperate bowl, add about
2 tablespoons of olive oil,
some very finely chopped garlic - I used 2 cloves,
a teaspoon full of cumin seeds
freshly cracked pepper and salt.
If you like it spicy, add some cayenne pepper. I also added some de-seeded green chilli finely chopped. (Now that I am thinking how I had prepared it, some ready-fried onions would have done much good too!).
And as I do in a lot of my recipes with starchy potatoes, a generous teaspoon full of 'Herbs de Provence' - a mix of dried Italian herbs. Mix it all and rub the potatoes with this mixture.
Bake them in a 350 oven for about 15-20 minutes.


For the fish, take some fresh filleted fish. They are usually made with cod but any dense fish works fine. Make a rub using a tablespoon of olive oil, 1 clove of garlic very finely chopped, salt, pepper, a tablespoon of freshly squeezed lemon, and again some de-seeded green chilli.
Rub this mix on both sides of the fish, and cook it on medium - each side for about 5 minutes.
Plate it up, and have it as is or with a slice or 2 of some bread. Share

Tiramisu


Tiramisu - translated it means 'pick me up'. Just one look at it, and it will beckon you to sink your teeth into it! It is one of those very simple - no bake desserts and all you need to prepare it is assemble a few ingredients. And then wait. Wait patiently until it is ready to be 'picked up'. This is an Italian dessert and found in trattorias all over Italy, and of course much loved the world over. Here is how you make it. Of course there is no one way to make it, it is so versatile that you can alter it any way you like it. Here is how I make it, and it is quite close to the traditional way to prepare it. You need

250 gm Mascarpone cheese
3 eggs - seperated
5 tablespoons of sugar
1 and 1/2 cup coffee - freshly brewed, and cooled to room temperature
ladyfingers - 1 package containing 24 pieces
grated dark chocolate and/or unsweetened cocoa powder
2 teaspoons rum. Dark rum is usually used, but since I had run out of it, I used white rum.


Alcohol is optional, and also the amount added varies from person to person ;)
For variation, you could try Kahlua (coffee liqueur)or good quality marsala wine. For a slighltly fruit-flavoured tiramisu, you could use orange liqueur, cherry liqueur..the options are really all upto you I'd say.
Here is how to assemble it all together. Put some coffee to brew - make it a strong brew. Leave it to cool. Now beat the egg yolks and sugar. Slowly add the mascarpone and continue beating. Add 1 tablespoon of the espresso, and mix it as well.
In a seperate bowl, whip the egg whites until it forms stiff peaks. Now fold the egg whites into the yolk-cheese mixture.
Pour the coffee in a dish big enough so you can dip the lady fingers in them. Add the rum in the cooled coffee. Dip the ladyfingers in the coffee-rum mix and layer them in a 9x12 dish. Do not be tempted to dip the ladyfingers for too long. Just place it for no more than 3 seconds else it will break apart. After the first layer is done, spread the mascarpone, egg mixture evenly. Layer more coffee dipped ladyfingers, and then another layer of the mascarpone.
Cover it and place in the fridge for at least 4 hours before serving. Sprinkle generously with cocoa powder and grated chocolate. Bon appetit! Share